

🍨 How to mint the Sunday:Drip sundae NFT?
🍨 How to mint the Sunday:Drip sundae NFT?
Step by step guide to minting for first-time NFT buyers (complete with pictures)


Here is the most simplified “How do I buy an NFT” article we could possibly write. There are absolutely several follow up questions that can be asked (that we can cover later), but we wanted to explain this process at a super high level for people who are new to the space.
I’ll go through the process using a popular bank, exchange, wallet, and marketplace to give you a feel for what each one does, but know that there are several other options out there.
First, the obligatory flow chart image, going from USD to NFT:
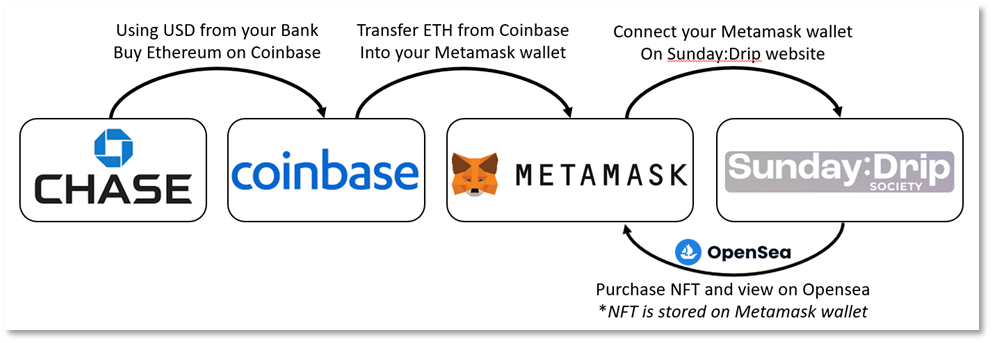
That’s the flow chart, now here are the simplified step by step instructions:
Create a Coinbase account and buy Ethereum (ETH) using your bank account
Download the MetaMask extension in Chrome and create a MetaMask wallet
Transfer ETH from your Coinbase account into your MetaMask wallet
Connect your MetaMask wallet to the Sunday:Drip website and mint a sundae
Connect your MetaMask wallet to OpenSea and view your NFT in your profile
Okay, easy enough. Now here are some screenshots to simplify this even more….
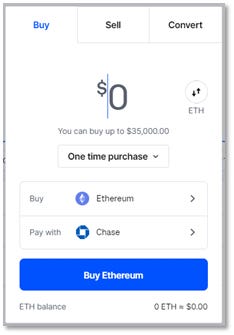
Step 1: Create a Coinbase account and buy Ethereum (ETH) using your bank account
Link: Sign up for Coinbase (Use this link to get $10 in Bitcoin free)
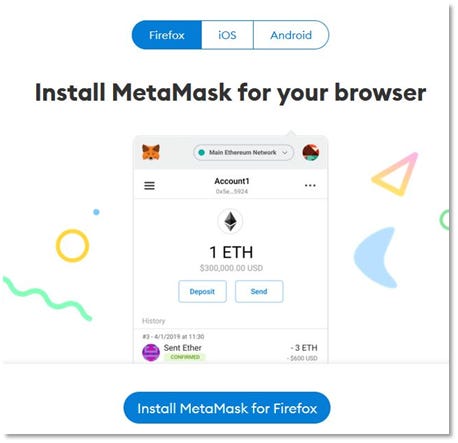
Step 2: Download the Metamask extension in Chrome/Firefox and create a Metamask wallet
Link: MetaMask
Metamask is a popular, browser-based wallet in the crypto world. You can store your cryptocurrency in wallets like Coinbase or Gemini, but it’s often hard to spend your tokens from there because most websites don’t seamlessly connect with them. Think of Coinbase like a cruise ship and Metamask like a row boat. Some major ports (or web3 applications) have space for cruise ships (Coinbase/Gemini) to dock directly (connect), but most require a smaller, more nimble boat (Metamask) to take passengers off the cruise ship into the port.
Metamask connects with nearly every app in the web3 world but can be hacked more easily (due to user error), so it’s best to store the majority of your tokens in a safer place (Coinbase, Gemini, hardware wallet) and only transfer ETH to Metamask that you need to rapidly access.
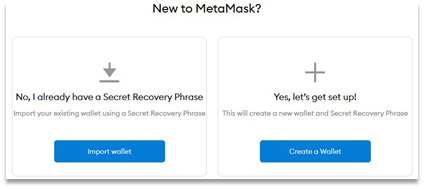
When you sign up for Metamask, you will be given a secret recovery phrase of 12 words and be asked to set a password. Your password will allow you to log into Metamask on a daily basis.
You will only need to input your 12 word recovery phrase one time if you are setting up an existing wallet on a new device for the first time. Your 12-word secret phrase is your last resort back-up for the wallet.
****DO NOT SAVE YOUR 12 WORD PHRASE ON YOUR PHONE, COMPUTER OR ANYTHING CONNECTED TO THE INTERNET****
Why not?
If someone hacks your computer and steals your 12 word seed phrase, they can take over your wallet and you could lose all of your tokens and NFTs.
Never. We repeat. NEVER share your 12 word seed phrase with anyone. We’d also advise that you don’t store it on any internet connect device (that means in programs like Microsoft Word, Excel, notes on your phone/computer and especially not an internet connected software program like OneNote, Evernote or Notion). If your computer is hacked, attackers can likely find your passwords and get your seed phrase.
The best practice is to write your seed phrase down on paper (bonus points if its fireproof). Hide it, but ensure it is in a state where they won’t wither away from dirt, dust or any other elements.
Step 3: Transfer ETH from your Coinbase account into your Metamask wallet

When you go in Metamask, you can click on the top where it says “Account X” with your Metamask wallet address underneath. Your wallet address will start with 0x and have a string of 42 numbers and letters like this “0x59D6D69730a147C64a6456D2CeF8486c5734935a”. By clicking on that address, you will have effectively copied your Metamask wallet address. This is the address you want to send your ETH to from Coinbase. Feel free to paste your Metamask wallet into your Notes app for easy access. This is not your secret recovery phrase. If someone has your wallet address they cannot take what’s inside without your secret phrase.
Next, go to Coinbase, click on Ethereum and then below the price graph, click on it again, this time in the thin rectangular box showing your total balance.
At the top of the next page, you will see the total amount of ETH that you hold, a QR code icon and a paper airplane icon. Click the paper airplane icon.
The screen that shows will enable you to type in how much ETH (denominated in dollars or ETH) that you’d like to send from your Coinbase wallet to your Metamask wallet.
Enter in the amount you’d like to send and press Continue.
Next, you will see a field that says “To” asking for your Metamask wallet address. Paste your Metamask wallet address in this field.
After pasting your address, press “Preview Send” and then press “Send Now”.
Within 10 minutes you should see that ETH deposited into your Metamask wallet. Coinbase can take up to 24 hours to reflect the deduction from your Coinbase account.
Okay, that was a lot of detail in those last two steps, but I promise those parts are important.
Step 4: Link your Metamask wallet to Sunday:Drip Website
Link: Sunday:Drip Website
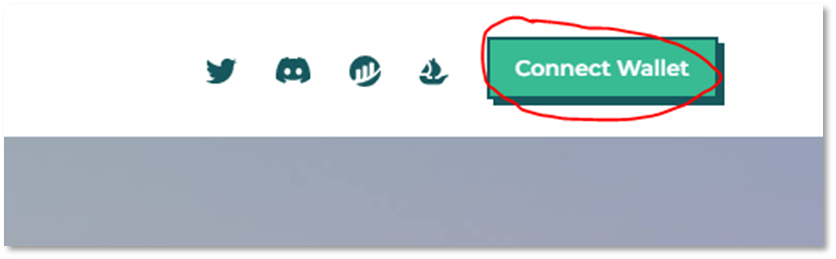
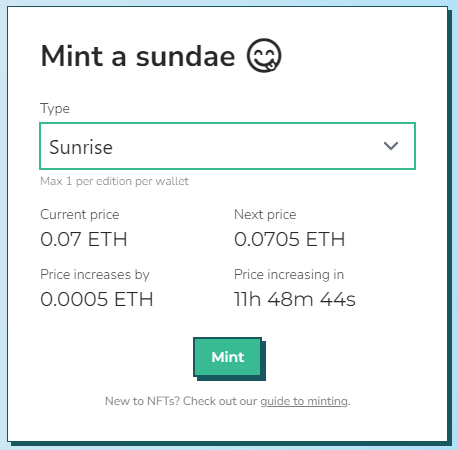
Take a look at he different styles and quantities available of our 3 types of sundaes. We explain all of this on the website.
Step 5: Connect your wallet to OpenSea and view your NFT
Link: OpenSea
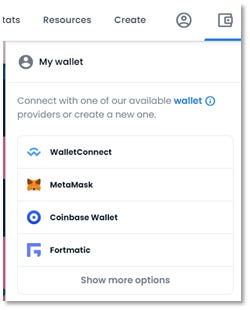
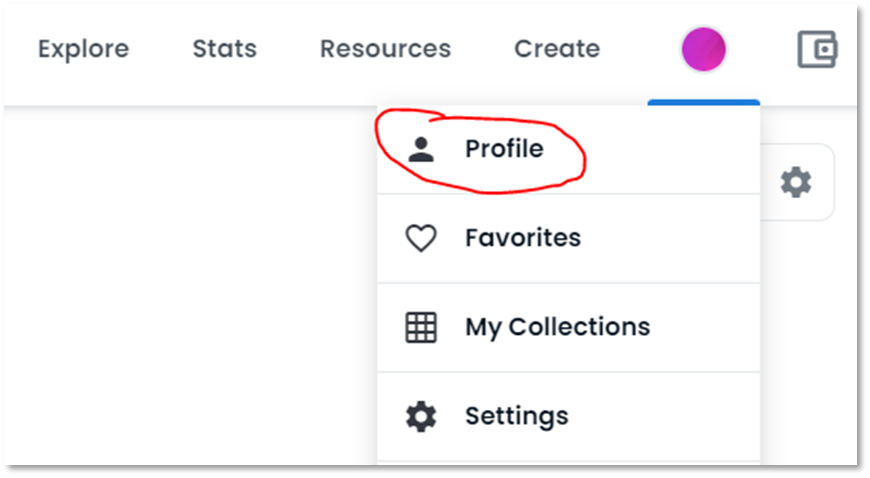
The beauty of crypto is that there’s no need to create account usernames and passwords. Once you have a Metamask wallet setup, that will act as your login/validation for everything.
When you go to Opensea for the first time, follow the steps to “Connect Wallet” and choose Metamask from the list. Once connected, you’ll notice that you now have a profile automatically created on Opensea tied to your wallet address.
Done. At a high level it’s an easy process, but the details of each step can bring more questions that we are happy to compile and answer in another article. There are also best practices that we can cover too!
Once your understand how a wallet, exchange, and marketplace works, you’ll be able to explore and use the other popular tools.
Legal Disclaimer: No information shared in this newsletter is financial advice. All content is for entertainment and informational purposes only. Wavy Labs, LLC is not a registered investment, legal, or tax advisor or a broker/dealer
Helpful? Not helpful? Questions? Let us know. Happy to help.